Quick Start
This is Quick Start guide walk you through steps from setting up a Python environment for lifelib to running a sample model. By end of this guide, you will see how to:
- Prepare Python environment for lifelib,
- Install lifelib,
- Create your project using a command,
- Build a model by running a script in the project
lifelib models are built in the form of modelx objects. Refer to modelx documentation when you have questions about modelx as you proceed with this tutorial.
To learn Python itself, there are many good tutorials out there on the web, such as the one on Python’s official web site.
This guide assumes users are on Windows platform, but lifelib runs on Linux, and probably on Mac as well although it’s not tested.
Prepare Python environment
You need to set up a Python environment to use lifelib. Downlowd and install Anaconda distribution. You must install Python 3.x version, not Python 2.7 version. lifelib does not work with Python 2.7. If you already have Anaconda installed, make sure the Python version is 3.4 or newer. Anaconda is a bundle of Python, its major packages and IDEs including packages required or optionally used by for lifelib, such as openpyxl, pandas, Spyder, and provides a Python environment out-of-the-box, just by installing it with few clicks.
Microsoft Excel is not required. You would only need Excel or its alternatives if you want to edit input data files.
Install lifelib
lifelib is avalable on PyPI - the Python Package Index.
To install lifelib, use pip command from a Anaconda command prompt.
Go to Windows menu and
start Anaconda Prompt inside Anaconda3 submenu to bring up a command prompt.
Then in the Anaconda Prompt, type:
> pip install lifelib
The command also installs modelx the package lifelib depends on. All the other required or optionally used packages are included in Anaconda, so no need to install them separately.
Create a Project
Now that you have installed all the programs and packages needed, you can start using lifelib.
First, you create your own project folder.
A lifelib project is a folder containing all the source files and data
for building life actuarial models.
A command lifelib-create helps you create a new project folder
by copying a template project from within the lifelib package to your desired
folder path.
For example, to create a project folder named
mylife under the path C:\Users\fumito by copying lifelib’s default project
template simplelife,
type the following command on the Anaconda prompt:
> lifelib-create --template simplelife C:\Users\fumito\mylife
Alternatively, since simplelife is the default tamplate,
so you can get away with –template option like this:
> lifelib-create C:\Users\fumito\mylife
You can check the created folder that are populated with Python scripts copied from lifelib’s default project.
Build the model
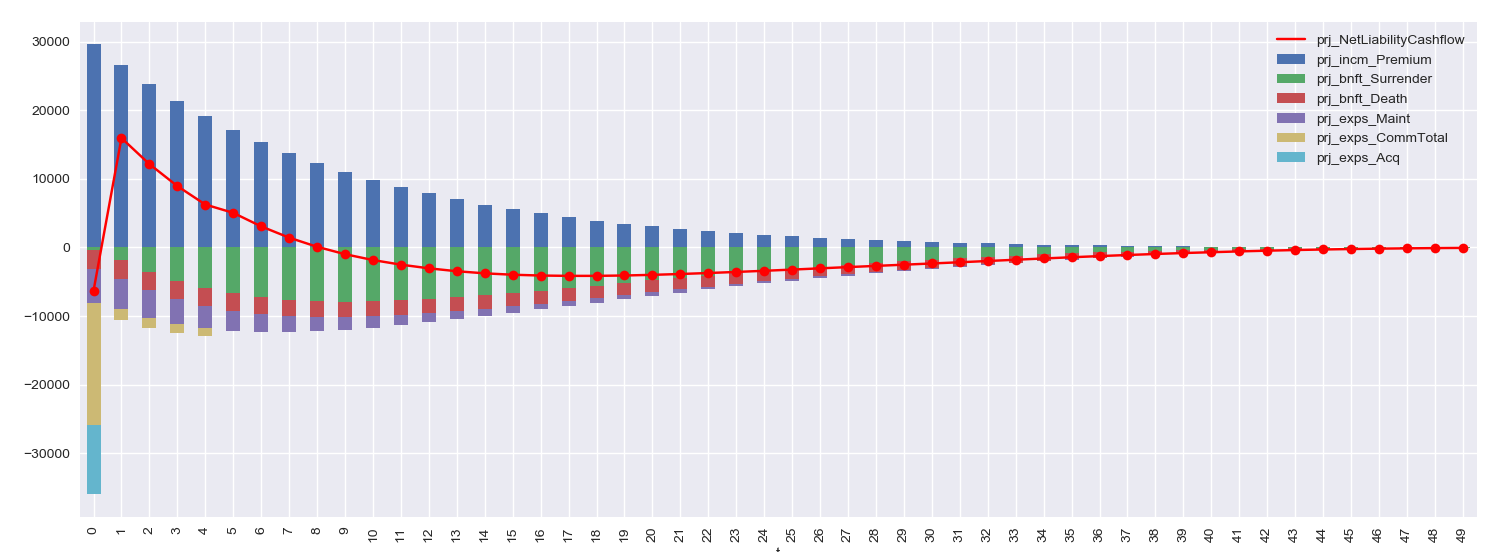
Let’s run a sample script to draw a graph of liability cashflows. Go to Windows menu, launch Spyder inside Anaconda3 menu.
In Spyder, open sample_liability_cashflow.py file from File menu
in the project folder you created, and Run it. The grpah below shows up.
After execution of the script, the session will move to interactive mode. The session is available in an IPython console in Spyder for you to interface with the created model.
The Projection space becomes available as
a global variable proj in the Python console:
>>> proj
<Space Projection in lifelib>